Wednesday, December 23, 2009

Button and saddle

Here is the button after fitting the neck to the body, still square. The neck, too, is not finished, as the button will blend up into the heel into the neck. As is traditional, I have laid out the button with a compass. If you look close, you can see the center mark of the compass, something that also shows up in classical Italian violins.

IMGP2651SqButton

Below is the button, and neck, mostly shaped. I like a large-sized button, this one being about 24 mm in diameter. It appears that the buttons were originally much larger than they are now, in part because each time the neck is replaced, a bit of wood is lost. Also, the classical Italian violins were Baroque instruments, which had bulkier necks. Most have been reshaped to more modern (ca 1800) standards. But this one is mine, so I can do whatever I want! :-)

IMGP2655RoundButton

The saddle is a small piece of ebony fit into the top of the instrument. It sits on the end block, and its purpose is to take the pressure of the tailgut. The tailgut holds the tailpiece, which holds the strings; on the other end, the tailgut loops around the endpin, which will fit into the small hole in the ribs. Without the ebony, the tailgut would crush the spruce top, and the tailpiece would contact the top.

IMGP2661Saddle

Tuesday, December 22, 2009

A little Yule-time building.

After a couple weeks of much cello repair, I decided to take some time to push my own instruments along. Here I have squared up the neck and end blocks for the Medieval fiddle. I have spacers under the form to lift it to approximately the middle of the 40 mm ribs, which will be bent and added after the blocks are shaped. The blocks are lightly glued to the form, and in clamps here.

IMGP2641MedFidBlocksRough

I spent the morning fitting the neck to the body of my current violin. Once I got it to the 'good enough' point, I decided to take lunch, then look at it again afterwards with fresher eyes. As I left, I turned back to the bench, saw the mess in the midst of the process, and thought it might be an interesting photo. On the white instrument, the neck is not glued in yet, but sitting in place, held by friction.

IMGP2636Lunch

This afternoon, with the neck fit ok, I glued it in place. The heel of the neck is still square; that will be rounded and the neck finished after the glue has set -- perhaps tomorrow.

IMGP2646NeckGlue

Wednesday, December 16, 2009

Design from nature

Violin design is based on simple components such as circles and lines. In this case, the f-hole can be derived from 2-dimensional surface of a 3-dimensional sphere. By carefully lifting the 'poles' from the orange, then unwinding the peel, the design of the f-hole is automatically revealed.

IMGP2632SphericalFhole

:-)

Thursday, December 3, 2009

Actually playing the fiddle...

... is something I do from time to time.

I do teach fiddle lessons in the shop, which gives me a good excuse to practice every so often. And we've had a couple of gigs in the past week to keep us busy. Last Sunday, our band, the Bru, played at a St. Andrews service for the First Congregational Church in Boise. It was a new experience for us, accompanying hymns as well as playing performance pieces. Seemed to go well, as they want us back next year.

Last night, Bill Elmer and I played for the preview of the opening of Alan Stanford's watercolor display at the State Historical Museum in Boise. Alan is a great painter, and had what looked like over 100 paintings hung on the walls in the Museum. Bill an Alan were best men at my wedding. (Photo by my lovely bride.)

IMGP1263ASTrio

We played whatever we felt like -- old-time tunes, Scottish, blues, folk. A nice evening.

The Bru's next gig is the Boise Contra Dance on December 19th. Rehearsal tonight!

Saturday, November 28, 2009

Student instruments

Student instruments are always problematic. They can suffer a great deal of abuse, unintentional and otherwise. Makers of student instruments -- factories almost always -- in the best of situations have to make something quick, strong, and reasonable. In other cases, they produce outright junk, which can neither be played nor repaired. If you are buying a new violin for $100, for example, you are buying junk.

Parents want their kids to succeed, and they want to save money. When it comes to material goods, however, the parents often think of the cost alone. A child learning to play a musical instrument can be handicapped by an unplayable instrument. That is no value, just cost, even if it is minimal. Learning, however, is the important thing -- that is the value. Any thought of resale value, particularly in a student instrument, pales in comparison to how the child's brain can be developed.

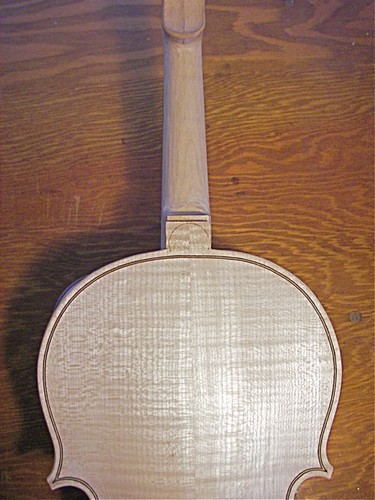
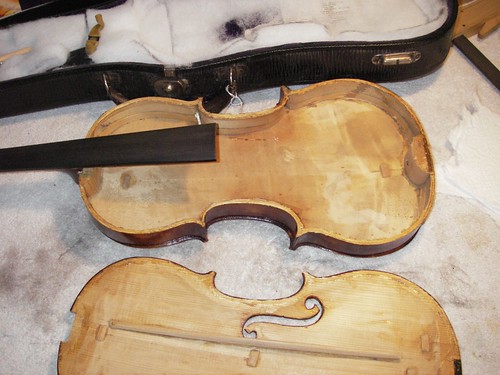
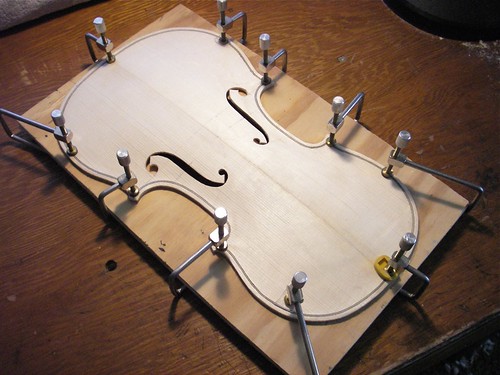
Here is a fractional cello that came into the shop recently. The top had cracked near the tailpiece. I could recognize it as the result of the endblock shrinking -- a very common event on low-end instruments. Preventable with good quality control, but right now that is not important to these makers. They sell instruments easily, so why change?

This one retails for about $1200, not a small amount of money for most parents in this area. And it is not the 'bottom of the barrel' -- I can actually get the top off in a reasonable amount of time with a minimum of damage.

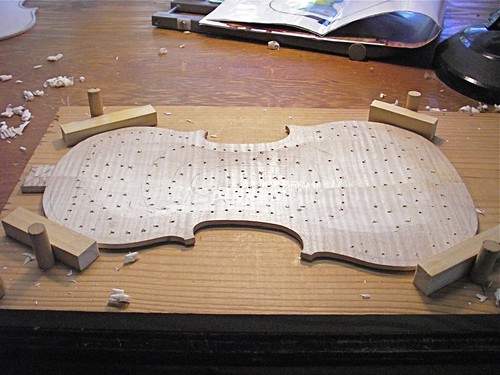
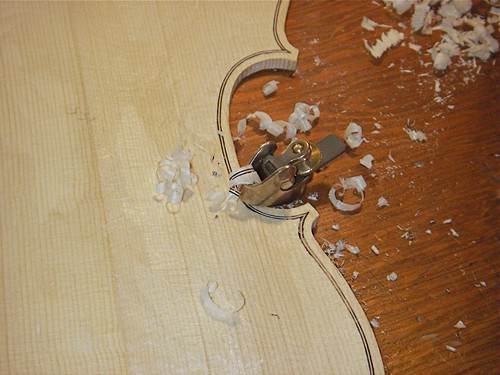
For comparison, though, I thought it might be interesting to show some of the inside details, that don't show up when looking at the shiny new instrument.

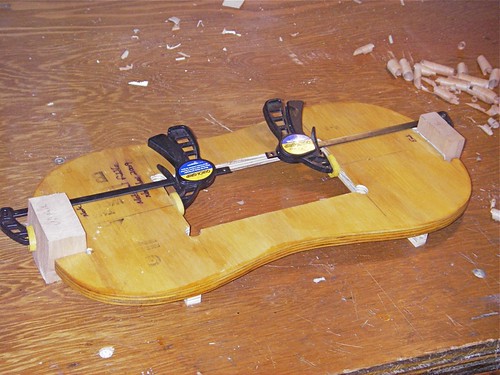
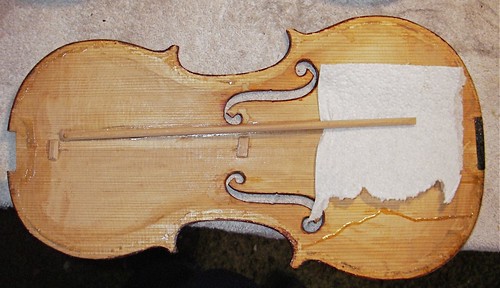
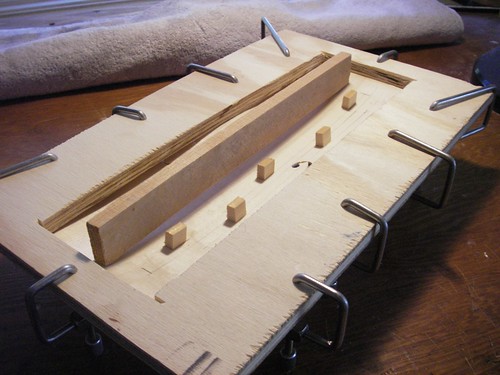
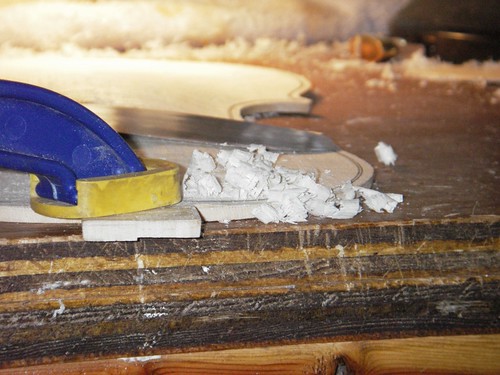
Here's the lower corner block on the bass side --

IMGP2416LBCorner

Notice how the block has been roughly split out, and that the c-bout linings, rather than running inside the block, actually stop far short of it. If the glue fails here, these will spring loose, creating quite a buzz.

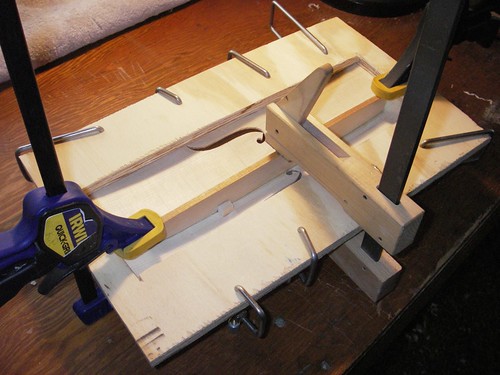
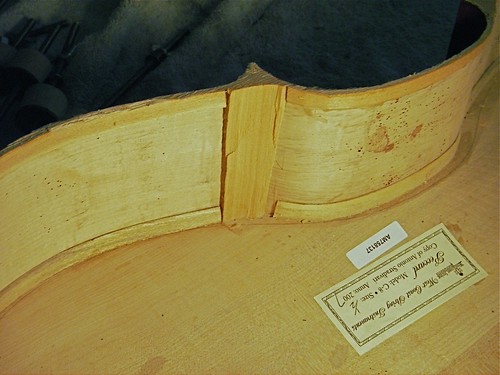
To show that it's not a fluke, here's the lower treble-side corner block.

IMGP2419LTCorner

It has similar problems. Again, to be fair, these are made very quickly. Any extra time is spent on the outside, the part seen by the customer.

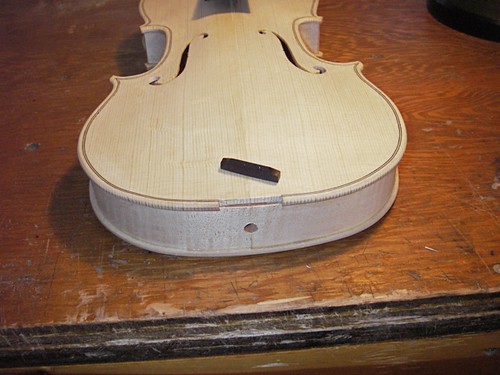
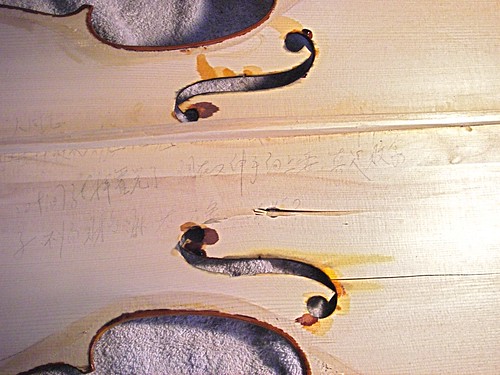
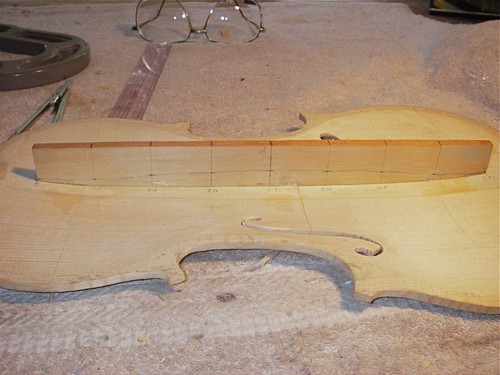
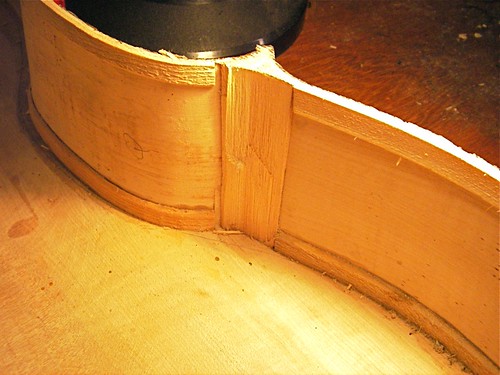
The endblock was just as rough. In this photo, you can see one split-out side, where the drill had been quickly pushed through, probably after the top was glued on. It had a similar fragment, hanging by a thin fiber, on the other side, which I had removed prior to this photo.

IMGP2422

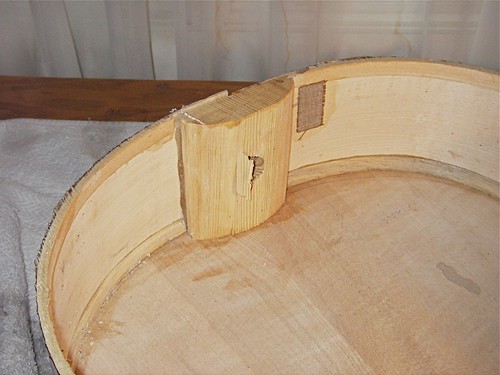
Note that the block is loose from the ribs. It is harder to see that the ribs themselves are split, radiating out from the end-pin hole. You can see a linen cleat that I have installed on one of the cracks. This type of damage happens when the cello is dropped on its endpin. A better block, however, might have held.

Thursday, November 26, 2009

A bass-bar and family history

A follow-up on the November 10 post -- out with the old, and in with the new.

IMGP2326BBReplace

I glued the top on a couple days ago, and will install a spiral bushing in the A-peghole, which had been split and repaired sometime in the past, though not well.

Monday, November 16, 2009

Attaching the fingerboard

Before the final shaping of the neck, the fingerboard needs to be shaped and installed. The ebony blanks come basically fingerboard-shaped, but far too bulky. With a series of planes, gouges, and scrapers, I reduce some of the mass from underneath as well as from above.

IMGP2299fingerboard

Once the fingerboard is in reasonable shape, I layout its position on the neck and then glue a few locater studs, in this case 2 on each side. This makes it easier to put the fingerboard on in the right place when the slippery hide glue is on.

IMGP2300fingerboard

I glue it on firmly, not a simple tack, because it's going to stay on. I use the fingerboard to help align the neck while fitting, and leave it on while varnishing, as was done in the old days.

Sunday, November 15, 2009

Medieval Fiddle, part 1

It's something I've wanted to build for some time, but haven't yet. We now have a group of Renaissance enthusiasts who are putting together a Ren Faire next year. They contacted me looking for musicians, dancers, etc., so I thought this would be a good excuse to actually get to work on one.

Here's a Medieval fiddle in action.

I had a plan for one, so got it out, laid over some tracing paper, and marked it out with pencil.

IMGP2268MFPlan

There are bound to be other, better ways to do this, but this is how I approach making a violin mould, and it's what I know. Once the tracing is adequate, I need to make a stiff template in that shape. In the past, I have used thin metal, because it's durable, but for this one I'm going to try something easier to cut, and use what's on hand. I had pickguard material, such as used on guitars, lying about, so glued the tracing onto it.

IMGP2271MFtemplate

With a knife and file, I cut it out, and smoothed it up. I have left a tab to the far side, with a couple holes along the center line. These are used to put the template down in the same place -- a registration device.

Again staying with the simple approach, I found a piece of construction grade plywood in the shop, left-over from a bit of roof replacement we did a couple years ago. I lay-out a centerline, then drill a couple holes corresponding to the holes in the template, and drive a modified 16d nail into each hole. The modification is that I cut off the heads and rounded the shafts. I use a small machinist square to make the nails square to the plywood.

IMGP2272MFtrace

Next, lay the template on the nails, trace out one half, pull the template up, flip it over, trace the other half. Remove the template and cut it out. Actually, I cut close to the line, then finish up with files, knives, planes -- whatever works for any particular part. One problem with construction grade plywood is that it's a bit coarse in plys, so is easy to tear. On my violin moulds, I use a higher grade birch plywood with more, and thinner, plys.

IMGP2274MFmould

At the inside corner of each block I drill a hole to allow for glue squeeze-out. The big cut-out in the center is simply for clamping. I use modern clamps to hold the blocks and ribs in place while gluing. A traditional method, at least for violins, would use round holes for dowels. String is then used to hold the ribs or blocks in place while gluing.

Tuesday, November 10, 2009

Humble repairs

I've been busy with repairs the past couple days, which is good for immediate cash flow, but takes time away from making. Today, for example, I took the tops off two cellos and one violin, not one of them really worth working on. The two cellos are modern Chinese-made instruments, but even so retail around $1200. Since these belong to end-users, who pay retail, they decided to get the repairs done. Both are being used by school orchestras, and tend to take a fair amount of abuse.

This one was badly damaged.

IMGP2292vctopinside

You can see where the soundpost penetrated the top. But, the pieces are all there, I believe, and the breaks are clean. I told the customer if I could get the top off reasonably, I could probably put it back together, and put a surface patch over the soundpost area. Not the greatest for sound, but these things don't sound that great to begin with. It's something of an experiment for me, to see how it works, but so far so good.

The interesting thing to me was all the Chinese characters written in pencil. Some story or something. Done before the bassbar was installed. I haven't seen much of that in modern Chinese instruments.

The violin whose top I removed belongs to a 'mature' lady. It is a very modest factory instrument, that she wanted to get put back in working condition for her grandson. It belonged to her father. I could tell by the exterior arching, collapsing, that something was wrong. Inspection with a mirror and light showed that the bass bar had failed. This seldom happens, though it is often blamed for errant buzzes and the like.

IMGP2288openfiddle

Note the lack of corner blocks. The top has been off at least once before, at least to repair cracks, including the installation of massive cleats. This instrument may have had an integral bassbar, meaning that wood was left behind when the top was carved. The top shows some rather non-subtle tool marks, characteristic of an integral bassbar instrument. Sometimes, when the top is off, these integral bassbars are cut out, and replaced with a real bassbar. She wanted it repaired due to its sentimental value.

IMGP2290bassbar

Here, I've slipped a piece of paper towel under the free-end of the bassbar. It appears that it was never fit well, which is probably why it failed. I removed the bassbar as well, and once I clean up the glue, will decide whether I can salvage this one, or, more likely, replace it with a new one.

Next-day edit: A YouTube video came up on a forum I read, which I'd seen it a few years ago, but didn't think of when writing this post. In it, you can watch a cello top being removed -- This Old Cello

Friday, November 6, 2009

Finishing the pegbox and scroll

With the box closed, it's time to get the neck ready. First to finish the pegbox and scroll. Here's the neck, cut-out of a block with a bandsaw, shaped with files and knives.

IMGP2197scroll

Then it's time to clean up the scroll, undercutting the volute, and adding a chamfer to the edges.

IMGP2203scrollundercut

I've laid out the centerline earlier, before cutting, and it needs to be refreshed from time to time. The pegbox, the hollow area between the walls, where the strings wrap around the pegs, needs to be hollowed out. I use a drill-press to make a series of holes, with the depth set to avoid drilling through the bottom.

IMGP2204scroll

I start with a narrow "U" gouge and remove the wood rather quickly. One needs to be careful near the walls, as this maple is highly figured and it's easy to tear-out. With most of the wood gone, I then move on to a variety of gouges to clean it up. It is quite hard to get under the scroll, near the A-peghole, so there I alternate between a curved palm gouge and a thin flat gouge.

IMGP2208scroll

The fluting then needs to be done. This is the double channel you see wrapping around the outside of the scroll. With the centerline clearly marked, I use the small palm gouge to make a double track up each, merging into one at the narrow places. These initial tracks are joined by carving with a larger gouge, all the time trying to keep the centerline sharp and straight, and the edges safe for errant slips.

IMGP2264scroll

IMGP2256Scroll

We are so lucky these days to have access to good information on classic violins. In the background of the previous photo, you will not the February 2009 issue of Strad magazine, with a much larger-than-lifesize photo of the scroll on the cover. To the right, is the poster of the 1715 "Titian" Stradivari violin, again from this same issue. By constantly checking the photos and looking at your carving from various angles, you at least have a chance of getting something reasonable.

Friday, October 30, 2009

Closing up the box

With the plates done, it's time to put the box together. First thing to do is knock the ribs free of the form. It is shown here, as it was at the end of the June workshop.

DividerCenter

By splitting out the blocks, and some finagling with the ribs, you can get it free.

IMGP2172ribs

The next step is to glue it to the back.

IMGP2173ribstoback

After the glue has set-up, the assembly can be taken out of the clamps. The blocks are trimmed to their final state, and if you're going to add a label, now is a good time to do it.

IMGP2185OpenBox

With that done, the top is glued in place.

IMGP2191ClosedBox

Now it's time to work on the neck, pegbox, and scroll. Starting to look like a fiddle.

Thursday, October 29, 2009

Fitting the bass bar

With the top to its final graduation, it's time to fit the bass bar. To keep the top from flexing, I clamp it onto a simple frame made of plywood.

IMGP2143BBframe

Prior to clamping it on the frame, I laid out the position of the bass bar, and glued temporary studs to help me put the bar down in the same place each time. It needs to be fit to the curvature of the top.

IMGP2147BBframe

After planing the bass-bar blank to its final thickness, I start out fitting by eye, then use carbon paper (ink-side up), then go to chalk for the final fit. Once it is fit, I glue it into place with hide glue. I'd like to have a few more clamps, and will have to get serious about making some -- more of them, and smaller. But for now, this works.

IMGP2150BBframe

After letting the glue dry overnight, I take the clamps off, trim off the temporary studs, and layout the profile.

IMGP2158BBflat

Using a large flat gouge to clear off most of the overhead -- needed with the clamps and frame I use, I then go to fingerplanes and finally scrapers to shape the bass bar.

IMGP2170BBfinal

Thursday, October 22, 2009

Graduation of the top

Following a similar procedure, I drilled small holes to leave about 4 mm of thickness and started scooping out with a large gouge. Spruce is so easy to cut after maple. Takes about 15 minutes to get rid of 95% of the wood. Here we are a few minutes into the process.

IMGP2075TopInitialScoop

After cleaning it up a bit with the large thumb-plane, I turn it back over and start laying out the f-holes. Doing it now allows for a little drill tear-out on the other side, which will be removed in the final graduation.

IMGP2082f-holesketch

I'm using a mathematical method to lay-out the f-holes, modified by the location of the f-holes in the 1715 Stradivari "Titian", a photocopy of that area shown to the left. For something that looks relatively simple, it takes some juggling. You have to look at the sketched-out f-holes from all angles, just to get it where you think you want it. In this photo, I have the upper eyes 42 mm apart, which is a modern dimension. The "Titian" f-holes are 40 mm apart. I'd like to keep them at 42, to compare more directly with my previous violin, but finally decide to place them at 40, closed my eyes, and drilled the holes.

IMGP2086fhole

Discovered I didn't have any reasonable saw blades to cut the stems. Not willing to wait, I decided to use a plunge knife, cutting inside the pencil lines. When I get closer to the final graduation, I hope to be able to drop these stems out, and clean up the edges with a knife (which is what I'd have to do with saw-cuts anyway).

Friday, October 16, 2009

Graduation of the back

With the arching to a reasonable point, I turn the back plate over and start scooping out wood.

Following Michael Darnton's advice, I am trying to be a bit more intuitive, a little less concerned about precise measurement -- the Picasso light-drawing concept . To begin with, I drilled a roughly random series of holes so that I have a 5 mm shell. My depth gauge is a makeshift device that looks like this.

GraduationDrillpress

The drill press is set to stop at a position above the tip of the ebony peg, in this case, 5 mm. After drilling holes, the back looks like this.

IMGP1996_5mmRandomBack

The large, 3/8" hole in the center is one I used in arching. A 3/8" inch dowel protrudes from my bench-top, which allows me to swivel the plate around to any position.

Using a gouge, I start removing wood down to the 5 mm depth.

IMGP2008Back1stHollowing

Without worrying about everything being exactly 5 mm, but close, I pencil in a graduation scheme, and drill new holes to match those thicknesses.

IMGP2013BackGrad

I am using the Strad magazine poster of the Stradivari 1715 Titan as my inspiration, as well as a grad scheme that was used at the now-defunct Eureka, California, workshop. Basically I have about 4.5 mm in the center, out to 2.5 mm in the bouts.

By the end of the day, between dealing with customers and a high-school age son who found a flat bicycle tire after school, I have gotten down to the finger-plane stage.

IMGP2017BackGrad

This maple is far harder, and with much more figure, than my previous fiddle, and is one tough son-of-a-gun. My fingers are sore tonight.

Friday, October 9, 2009

More arching work

The back of this violin has fairly nice figure, which means the grain direction is a mess. To avoid tear-out while using my finger plane, I switched to a toothed-blade. In the morning sun through the east window this morning, it is easy to see the tracks from this blade.


Once the arching is to a point I think is reasonable, I switch to a scraper to clean up all the tooth tracks. A scraper is a thin piece of steel, cut to shape, and then sharpened. I sharpen on one side only. A good edge will raise shavings like a plane or gouge.


With a glancing light, you just keep working until all the 'offending bumps' are gone.

Tuesday, October 6, 2009

Cleaning up the arching

With the purfling in, I now start on getting the arching to its final, or at least nearly final, state. I use templates, based on the original instrument, in this case the Stradivari 1715 "Titian", but cleaned up with curtate cycloids. Curtate cycloids are similar to what people of my age might remember as a spirograph, and are an old mathematical form, certainly known in the time of Stradivari and Amati. To draw a curtate cycloid, you can take a button. Put a pencil through one of the thread holes, run the button rim along a ruler, and trace out the pattern on paper.

While planing down to the final arching, it is satisfying to pull up a fine strip of the purfling as you go.

Friday, October 2, 2009

Purfling

Purfling is the black-white-black strip that runs around the edge of the top and back of a violin. It is typically made of three pieces of wood, dyed black (or nearly) for the two outside strips and dyed white (or nearly) for the inside strip. The violinmaker cuts a little channel all the way around the plate, then bends and fits pieces of purfling, which is then glued into place.

I just finished gluing the purfling on my latest --


The arching is incomplete here, as is the purfling, which still needs to be blended into the profile.

Purfling is a picky job. Because of a competition I'll mention later in this post, a friend sent me a quote from Biddulph's book on the maker Guarneri del Gesu. I received it just this morning, after I had cut and bent the purfling and channel, but was dissatisfied with my job, wondering what to do to clean it up. --

"The slot for the purfling is frantically cut. The knife slashed roughly along its intended route, leaving marks which career over the finished edge. The mitres are only approximately formed; the large gaps were sometimes quickly filled with paste, or simply left open. The purfling pursues a hesitant course, stopping short of the end of the corner, and meandering across the wide channel..."

Guarneri del Gesu is considered by most to be among the top two violin-makers, the other being Stradivari. This quote is in reference to the instrument named "Ole Bull" after the famous Norwegian violinist who owned it. It is reportedly a very nice instrument, and there is currently underway plans for an exhibition in 2010, featuring violins made on this model by living makers. You can read more about that here.

Wednesday, September 23, 2009

What is music?

I have been an on-and-off subscriber to Strad magazine since 1996. Great photos, good stories, expensive.

Bundled in with the September 2009 issue is a special edition "Violin Heroes," which has stories on various violin players and their heroes. For example, someone playing now refers to Jascha Heifetz, and then the next story might be a reprint of a Heifetz profile from an earlier Strad issue. I should also mention that Strad magazine comes from England.

One that stood out in my mind came from the March 1923 issue, and started with this:

“The violinist (Jascha Heifetz) had risen to fame in America, and by April, 1921, seventy or eighty thousand records of his playing had been sold in England. Assuming that each record was put on ten times, and that each reproduction was listened to by an average of three individuals, Heifetz had been heard more that two millions of times in England before he sounded a note here in public. The brain goes dizzy at the thought…”

All of us now hear far more recorded music than live music. We get to know musicians first, and often only, through recordings. Interesting to think that less than 100 years ago this was reversed, as it was since the beginning of time.

A few years ago, the early-music expert Christopher Hogwood gave a talk at nearby Boise State University. Many interesting points, but I was most surprised when he pointed out that we are the first people in history to be able to hear what music sounded like 100 years ago. And I shouldn't have been surprised, because just a year or so earlier, I had gotten the CD recording of James Scott Skinner, Scottish violinist (1843-1927), which was originally recorded in the early twentieth century. Here is a list which includes those recordings, as well as others.

There are times when I think that having too much information is paralyzing. And I feel sinful stating so.

Monday, September 21, 2009

Estimates sight unseen...

... are almost always a bad idea.

Naturally people would like to know what sort of expense they're about to incur, so they want a dollar figure without having to drive all over town. When I am forced into it, I almost always aim high, just in case. If it comes out less, people are happy. But going high is a good way to lose work, too. It's a tough balance, and usually I will say that I'm happy to give an estimate if I can see the instrument, but not over the phone.

Case in point -- I do repair work for some of the local music stores. One day I received a call from one, asking what the charge was to install fine-tuners on a violin. I mentioned two options (i) installing 4 fine tuners on the old tailpiece, and (ii) installing a new tailpiece with built in tuners. The second option is almost always better -- the assembly is lighter, it allows for proper adjustment of the afterlength, and for both those reasons usually gives better tone. It is slightly more expensive.

The customer went with the first route, the less expensive route. When I arrive at the music store, I see the violin, a cheap 60 year-old instrument with a tailpiece made out of some hardwood died black to look like ebony. The tailpiece is overly fat, nearly too thick to allow the fine-tuners to be installed, and too long to let the arms swing free. A real pain in the butt. Since I'm away from the shop, I have a limited selection of hand-tools. So, I'm modifying the tailpiece to allow me to install the fine-tuners, taking far longer than I had allowed for, with tools that I wouldn't use in the shop. Not a good way to make money. I did stick with my estimate, and the tuners are installed in working order, but it did further my commitment to not make estimates sight unseen.

Wednesday, September 16, 2009

YouTube videos

An amazing array of videos are out there on sites such as YouTube. While the sound quality is not the greatest, being able to watch the bowing and fingering more than makes up for it.

I have started a list of what I think are interesting, fun videos on my web page, which can be found here.

More will be added, and if you know of a good video, let me know.

When I'm learning a tune, I want to listen to it about a billion times, just to pound it into my thick skull. Usually I don't want to keep hitting the YouTube replay button; I'd like to have it on a CD on repeat or on my computer, in iTunes on repeat. With the Zamzar you can convert a YouTube video into an mp3, or mp4 video, or a wide selection of other options I don't understand. This can then live on your computer or be burned onto a CD.

Certainly I'm not advocating this for copyrighted material, or if the version of the tune is available commercially -- we need to support the artists -- but many of the YouTube videos I see are just regular folks playing traditional tunes. It is a good way to learn.

Tuesday, September 15, 2009

First post


This is my first post on a new blog. Just trying to understand the mechanics here.

Eventually to be linked to my web-page, which I have recently revised and am also in the process of learning how to update & modify. Owyhee Mountain Fiddle Shop

The photo in this post is of work I did at the Southern California Violin Makers Workshop this past June. This photo, others of the workshop, as well as even more photos of violins and violin-making live on my Flickr page, here .