Thursday, July 12, 2012

Fiddle in-the-white

With all the pieces finished, it's a matter to put them together.  Glueing the plates to the rib assembly (after it's been removed from the form) is fairly straight-forward.  You need to be a little careful to get the overhangs reasonably uniform, and to clean up any glue that gets onto wood that will later be varnished.  Setting the neck is challenging -- lots of angles to get right, nothing flat to measure against, and you can't see it all until you get it where you want it.

But, we trudge onward --


To give the wood a little character, we expose it to UV.  Nowadays, most builders seem to have nice UV boxes, and I want to build one, but right now I just do it the old way -- sunlight.


We're hot these days -- 6th day in a row at 100 degrees F or over, and the skies are a bit thick with smoke from surrounding wildfires.  Here's a shot of the sky a couple evenings ago, with both thunderstorm clouds and smoke.


Of course, if I get even a hint of a thunderstorm, or even wind, I bring the fiddle indoors.  Not interested in that sort of antiquing!

Friday, July 6, 2012

Scroll carving.

The violin scroll is that one recognizable part that everyone knows, except maybe beginning violin-makers such as myself.  What does it look like anyway?  To the general public, they all look the same.  To experienced violin-folk, they're individual.  Guarneri del Gesu's loopy asymmetric scrolls seem charming in a way the rest of us can only envy.  The near perfection of Stradivari or the Amati are something we can strive for.  In the meantime, those of us toiling with the scroll -- which has really no impact on the sound of the fiddle -- cut one, look at it, learn something, and resolve to do better next time.

Here's a side view of my current project, with shadows -- helps to bring out the tool marks, some of which I'll get out of the way, others I'll not see until too late or ignore because they don't bother me.  Right now, there are still plenty that bother me, but I'll look at them another day.


Here's a more conventional view.


Not completely finished, but I can straighten up some of the lines tomorrow.

A non-typical view point for most folks, but for violin makers, you end up looking at the darn thing from all sorts of angles.


So, I'm not completely happy with it, but on the other hand, it will be ok, and now I can concentrate on the neck and fingerboard, which really is important to the player.  Surprisingly, or perhaps not, but the neck is crucial.  It's the one place on the fiddle that the player's hand comes in contact with the fiddle, and has a tremendous influence on the way a player views an instrument.

But visually, more people consider the scroll.  Oh well...

Thursday, July 5, 2012

Glueing the top to the ribs


Getting ready to remove the form from the ribs, I clip the blocks with a chisel and mallet.  This gives me a little more wiggle room.

The rib assembly is flexible yet strong.  It only takes a few minutes to get the form out. I clean up the blocks most of the way before glueing the top on.


Hide glue and clamps, we starting to have a box.  Always a fun point in the process.  I spent some time carving the scroll today as well, and it is sitting in the background between the sharpening stone and the caliper.


Now a glass of wine is in order.

Wednesday, July 4, 2012

Finishing the inside of the top

With the outside pretty much done, it's time to finish the inside of the top.  I use a big-sweep gouge to remove most of the stuff, and this goes fairly fast.  Then onto thumb-planes of decreasing size.  At the end, you're removing fairly thin shavings.  This thumbplane has a sole length of 28-mm, or about an inch and an eighth.


I use a graduation-punch modeled after the one in the Stradivari Museum in Cremona to mark the final thicknesses.  Here, the punch is a 16d nail sharpened on a grinder and the anvil is a carriage bolt with a wing-nut soldered on to allow up and down adjustment.  You simply put the plate in the center, against the anvil, and lower the upper arm to press holes to the proper depth.


As we get thinner, we can use light to look for uneveness.


It's a little-known fact that Stradivari invented the incandescent lightbulb for this very purpose.  At least, that's what I've heard from some violinmakers, but further research has shed some doubt an that attribution.  At the very least, bright light is a good tool on new wood.  The two dark bands here are stripes of denser wood showing up more and more prominently as I proceed.  Wood -- you never know exactly what to expect.

When the inside is finished, the bass-bar material is then fit to the surface.  Once the fit is done, it is glued in place with hide glue.  Here I am using simple, old-fashioned clamps to hold the bass bar in place.


After the glue has set, the bassbar profile can be shaped.


With that, the insides are done.  Next is to shape the edges, then glue the top onto the rib assembly.

Monday, July 2, 2012

Weiser 2012

The National Old-Time Fiddlers Contest has been held during the third full-week in June for many years now.  This year was its 60th anniversary (the same as celebrated by the Queen of England), though I don't know that it's been the third-full week in June all that time.  It has since before I've been going.  Went to my first Weiser in 1995.

Phil Stanley, a Boise bowmaker, and I have been running the repair shop for maybe 10 years now.  We're not sure, and would have to look through our records to figure it out -- clearly not important enough for us to actually do it.  We started out the first couple years running it under Hartz Music's sign, but since then on our own hook.

We set up behind the practice area in the Weiser High School.  Here's the view as you come in the door.


As you can see, visually its a mixture of high-school sports, woodshop, computer shop, and our violin and bow shop.  I have a place here in the foreground to do violin repairs, while Phil sets up at the back bench where he does bow rehairs and repairs.

We sell books, cases, bows, fiddles, some strings and tuners.


Phil tries to sell his handmade bows, and I try to sell my fiddles, both factory and handmade.


We've been there long enough that we have a good time seeing the same faces year after year, as well as seeing what were little kids becoming young adults.

Friday, June 29, 2012

Laying out and cutting f-holes

Using a few straight lines -- down the center, across the stop length (where the bridge will sit), and across at the low point of the c-bout purfling -- and circles of 32- and 64-mm, I'm trying to make the f-holes look right.


I'm using the lay-out scheme featured on Michael Darnton's website, as well as an image of a Brothers Amati f-hole he likes.  Even with all that, I still end up adjusting it a bit by eye.  And in doing so, hope to train my eye in the long-run.  Finally, say 'good enough' and cut the holes.


At this point they've got something of the shape, but still a little too thin.  How to decide that?  I make them wide enough to get the soundpost through.  I'm sure there must be a better criterion, but that works for now.

After a bit of clean-up work, I think I have them ok.


The poster below is of a 1666 Nicolo Amati, son of one of the Brothers Amati, and what I used as a model for my eye.  Again, not a perfect copy by any means, but something I hope works and looks decent.

Sunday, June 24, 2012

Southern California Violin Makers Workshop 2012

June is typically a busy month for me.  Since 2008, I have been attending the Southern California Violin Makers Workshop for a week, sometimes 2, and then during the third full-week in June, we have the shop set up at the National Old-time Fiddlers Contest in Weiser, Idaho.

So today I'll post about the workshop.  It's held in Claremont, California, put on by Jim Brown, and taught/led by Michael Darnton of Chicago.  The grounds are not too bad.

The violin-makers workshop was held on the ground-floor in this wing of the building --


while the bow-makers were across the way in this wing, behind the arched walkway --


Most of the attendees had been to the workshop before, and all (in the first two weeks) had built previous violins.  Everyone was at a different place in their current violin and the atmosphere is such that we can ask questions about anything at any time.  We all just set down at a bench and start working.  Seeing what other people are doing, how they're doing it, the tools they're using are all wonderful ways of learning.

For me the greatest thing is that I learn so much I didn't even know to ask about.

One of my goals this time was to learn more about the outline and corners.  I believe I made a major conceptual breakthrough in my understanding of corner geometry.  I was never happy with the shape of  my violin corners, mainly because I didn't have a clear picture in my head.  Now, after years of having it presented to me, something finally clicked.  It's now a matter of execution.

Towards the end of my week there, I got the purfling in both plates of my Brothers Amati fiddle.


And I spent some time working the edges down.


The workshop's official site is here.  If I understand it correctly, the workshop is accepting beginners during the third week.

I have more photos of the workshop here.

Michael Darnton's website is here.


Thursday, May 17, 2012

Back beginnings


Usually I carve on the back first, but this time I started with the top. Now onto the back, and man, is that maple tough compared to the spruce. I cut the outline today, and started removing wood, getting towards the arching.

The silver piece in the upper left is a long arch template. I have my long arch fairly nice now, but it's still 19mm high in the center, so will need to come down a bit, more towards 16 or so.

Buried in the shavings on the upper center-right is a large gouge that I use (after the scrub plane) to remove wood fast.

In the c-bout is my large thumb plane, which actually removes a lot of wood in a hurry, too -- so much so that it actually gets quite warm to the touch.

Wednesday, May 16, 2012

Refining the edge and arching

I spent time today cleaning up the edge and the arching. For the cross-arching, I am using curtate-cycloids, which seem to follow Cremonese arching fairly well and are at the very least a practical concept for the arching. I have the edges down to about 4.5 mm, so once the edges are adequate, I can put the purfling in. First, though, I will get the back to near the same state to get the corresponding edges and overhangs somewhat coherent.

Friday, May 11, 2012

Top work

Spent some time this afternoon marking out the top, cutting it, cleaning up the outline, roughly, not to the final, and a little preliminary arching. This is the fun part where lots of wood is quickly removed. This top was last discussed in this blog here.

Friday, April 27, 2012

Into this neck of the wood.


A little progress on the scroll.  Cut out on the band saw.  Mostl of the initial shaping done with rasp and gouge.  Drilled the string holes.


Roughing out the interior of the pegbox.  This goes fairly quick, but it is a work-out.  I still need to clean up the edges.  Lots of curl in this wood, which means it's very easy to get tear-out where you don't want it - which means I have to resharpen tools before finishing up.  But another day, I need to get back to repair work.


Following, or trying to follow, a scheme by Joseph Grubaugh and Sigrun Seifert for the Brothers Amati Scroll (Strad magazine, March 2006).  I'm not sure that I am interpreting the transition from flat paper to curved surface correctly, but am plunging onward.


A bit of work to cut out the sides of the pegbox and the first turn in the scroll.  This highly figured wood really likes to tear out -- lots of work with the rasp!

Wednesday, April 18, 2012

An adventure in necking.


I had hoped to be much further along, but decided instead to behave like an idiot. I am working on a Brothers Amati model, based on a form I drew following Francois Denis's method. He also has a bit on drawing the scroll, but I am also trying to make progress prior to the So. California workshop in June, so I was trying to save a little time.

I did have a Strad magazine poster of a 1666 Nicolo Amati violin, which has a very similar body to the Bros. Amati outline, so my plan was simple. Scan the scroll part of the poster, print it out, glue it on to a generic neck outline. Close enough for now.

I have a new-to-me computer. The scanner is a few years old. It works fine. I scanned the poster. Print out the scan, and it's huge. Go back to the software, adjust settings, resize the image. After 3 or 4 tries, I have it pretty close to the poster image.

This is a Strad poster from 1996.

I try splicing the scanned scroll onto the neck. Hmmm. It looks a little big. Maybe a lot big. Back to comparing with the poster. Same size. Hmmm. Finally (duh!) I turn the poster over and read the measurements.

Strad magazine has gotten a lot better on their posters over the years. I do remember, however, being cautioned that the photos are not always accurate to size and one should check the measurements against the photo.

That is actually a very good idea.

The poster's scroll was, from heel to end of the scroll, a cm longer than the real thing. Not enough for me to notice out-of-context.

So, back to the drawing-board (computer). A few more re-scaling attempts and I get something that is reasonably close. Attach it to the neck template. Glue it to thin metal. Cut it out, file down the edges.

Not enough time today to mark-out or cut the scroll, but I'm sure ready for tomorrow.

Unless some other conceptual problem pops up.

Tuesday, April 17, 2012

Fiddle hairball


Just another hairball photo. Many players are surprised to learn that a fiddle can have a hairball rolling around inside it, yet it is very common. This one, just above the loose soundpost, is actually fixed in place by rosin that has fallen in through the f-hole.

Some luthiers worry about these hairballs. I know folks who replace them after doing the repair work and others who collect them. I usually just take them out and throw them away, thinking they are something like 'dust bunnies' under the bed. So far, I haven't had any customers who expressed any interest in keeping them, either in their instruments or out.

Saturday, March 24, 2012

Squaring a neck.

I was squaring up a block for the neck this morning before breakfast, just getting a little done while waiting for the rest of the house to get going. This was a rather plain looking block, didn't cost all that much, and didn't seem to nice -- but after removing a little wood, it had quite a nice sheen to it, as well as some nice figure.


Don't know if it will match the back I have for this one, which I think is rather plain, but the ribs are flamed, so a mongrel it will be.

Thursday, March 22, 2012

One small step -- joining a top.


I have been so busy with work lately that I haven't had a breath of time to work on my own instruments. Today, I finally said to heck with it and joined a top. It has been since the end of November when I've done anything towards my Amati Bros. form -- so now I have a top to work with. Small victory, but still a victory.

Saturday, March 17, 2012

1737 Geometrical Construction Error

I have just started reading “Architecture and Geometry in the Age of the Baroque” by George L. Hersey, which was recommended as another good book into the theoretical mind of the time -- connecting music and architecture.

In the book, on pg 16, is Guarino Guarnini’s scheme for drawing a Golden-section rectangle, published in 1737.

There was a clear typo in the text, where

CH:FH :: FH:FA

should have read

CF:FH :: FH:FA


Or at least it seemed obvious to me, then I wasn’t so sure, so I thought, heck, I’ll just do the construction, then measure and calculate the resulting ratios. I tried it 3 or 4 times. Expecting to get 1.618, I was surprised to get 1.73 or 1.74. What the heck is going on? So I did the quick theoretical calculation -- maybe where I should have started -- and found that the ratio from this construction is actually the square root of 3, or about 1.73.

Guarnini’s method is/was wrong. And here it was being presented in an architecture text written in 2000 as being correct. And then, perhaps, in a subsequent edition, there is a footnote (14) that presents the error, though it is not corrected in the text itself.


Saturday, March 3, 2012

Internal edgework and tool marks

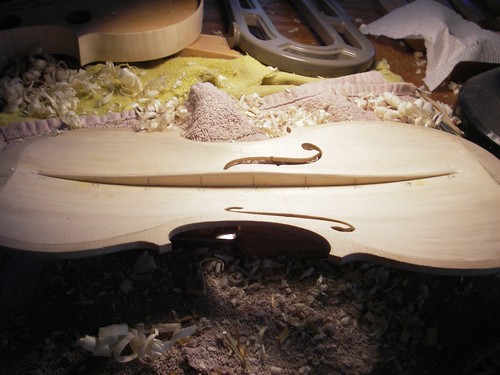
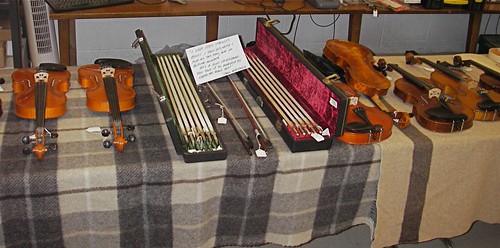
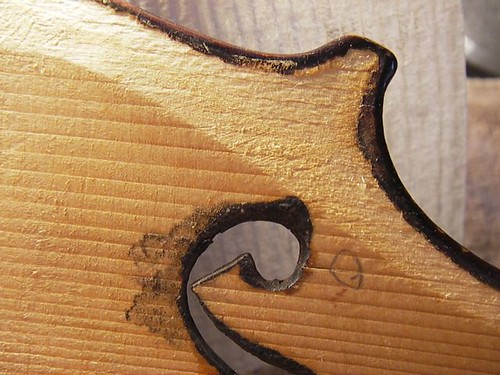
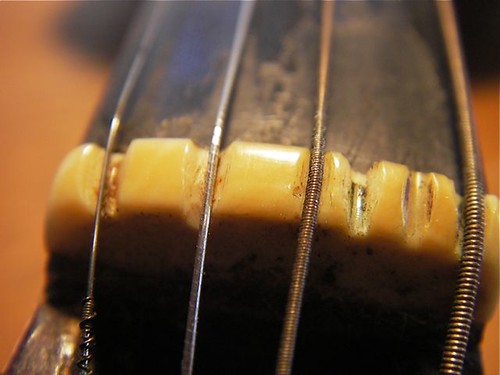
A couple fiddles on the bench right now, that I'm trying to fix up, and not 100% sure that it will come out on either, but they had such different internal work that I thought that was interesting. This first one has a very wide platform inside the plate -- so wide that the sanding marks are still easily seen. Before this top was graduated (the inside scooped out) it was, perhaps, held down on a large belt sander to make a flat surface. You can see it here first as a difference in color from the lighter, rougher flat surface to the more defined cut surface towards the f-hole. Note also the stain which has filtered, or slopped, in through the f-hole, and the yet-to-be-repaired wing crack, located by the penciled circle.


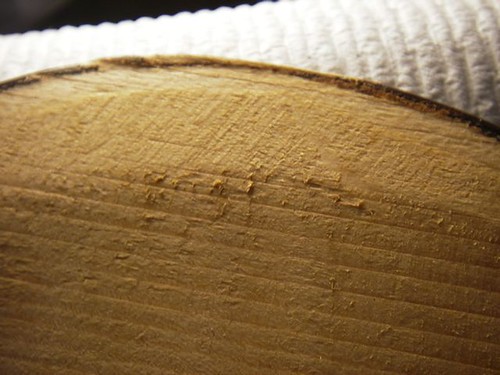
Here's another shot of the wide sanded platform left around the edge. A little closer in, you might be able to better make out the parallel sanding marks.


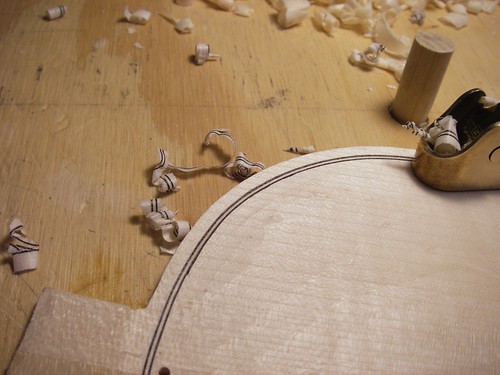
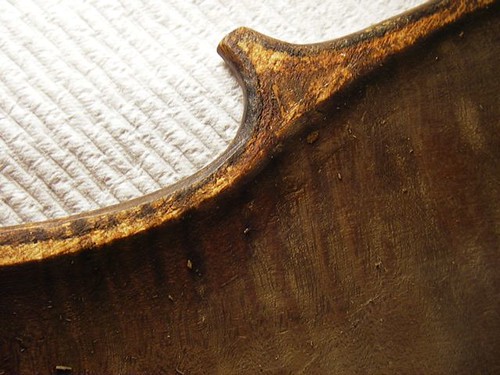
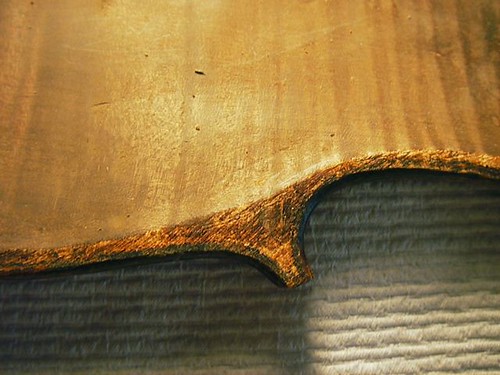
By contrast, this one has almost no platform. The arching dives sharply away from the edge, making a dark shadow. In some places, a previous repairman noted that the ribs overhung too far inside. To 'fix' this, he shoved some woodputty to fill the gap. This back is also darkly stained and has about a pound of dried hide glue, in gobs all over, which I am slowly removing.


Another shot of the very thin edge. If you think of the external overhang, which you can see the stain of on the corner, then go back in 1 mm for the rib, and say, another 1.5-2 mm for the lining, you can see there's not much wiggle room.


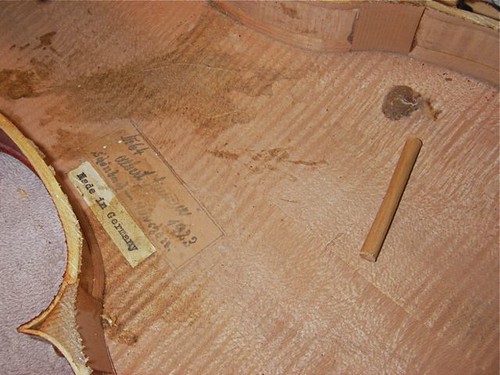
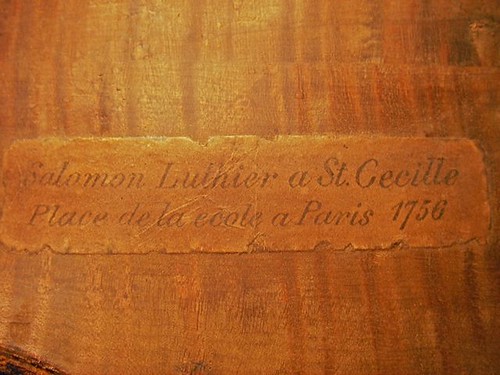
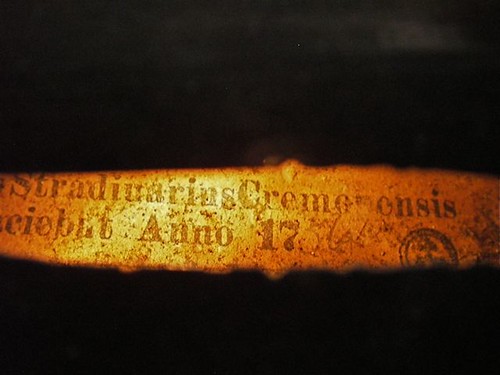
The thin-platform fiddle has, on the other hand, a very interesting fake label!


Inside of the "Salomon" violin, as it was when I removed the back (not hard to do, as it was simply hanging on at a few places. The bass-bar appears to be a recent replacement, reasonably done, a new soundpost, and a dust-ball, which is usually a sign that it's been intact and played for a while. Note also the brown staining to the wood, especially visible on the ribs and end-block. Also not the glue spread everywhere on the top, with much excess at the rib-top joint.


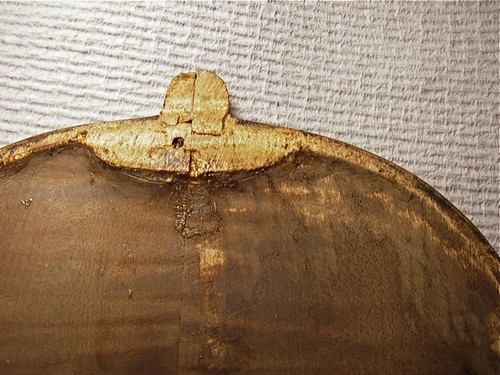
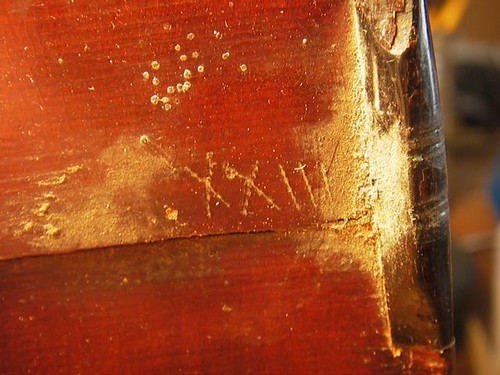
Here's the upper-inside back of the "Salomon" violin. You can notice that the wood that was under the neck block and ribs is relatively white, while the rest of it dark. Also note the area from, say, 1 o'clock to 2 o'clock, where I have removed some excess hide glue. The water I used removed some of the 'age'. This is the same water I use to make my coffee, so maybe it will help keep me younger, too! The stain was added to the inside of this fiddle, along with the label, to deceive people. That's it, pure and simple.

Sunday, February 19, 2012

1756 Stradiuarius!


This is one of three fiddles I bought Friday, three of 10 the fellow brought in. It is not a great fiddle, not in great shape, but maybe will turn into something playable. If I can get two of them to work out, I might come out on it.

The seller had done enough research to know that Antonio was dead for nearly 20 years by 1756, so suspected that this may have been built by one of his sons. Of course, it wasn't -- being a factory fiddle ca. 1900.


Note the numerous nut grooves, as well as the guitar strings for the G and D -- no sense wasting a good used guitar string! Obviously this nut will have to be replaced, and we might be able to get the e-string groove to fit a little better. :-)


Homemade bridge with generous string spacing.


Copper wire tail-loop holding...


... an ornate tailpiece.


Mechanical tuners.


One often sees these Roman numerals on bows, to keep the stick and frog together. Less common on fiddles, though I have seen them under fingerboards. This one is hidden by the tailpiece when the instrument is strung up. Note the wire grooves in the saddle.