Monday, October 29, 2018

Midnight in Moscow

We've played the Halloween dance in Moscow (Idaho) a couple years now.  Always a fun event.

 Dance!  Now!

We load up the cars Saturday morning, drive the 6-7 hours from the Boise area to Moscow.  Stop for lunch in Riggins at Kate's Cattlemen's for lunch.  Good spot.  Arrive in Moscow in time for a quick beer or two at Rants and Raves --


 -- then a nice home-cooked dinner with our hosts, Roberta, Tim, and David.  We gain an hour on the clock going north.  Moscow is in the Pacific Time Zone, Nampa in the Mountain.

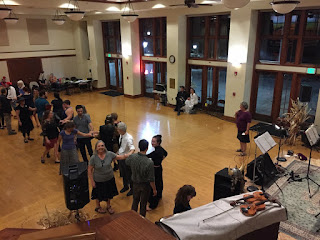
Then off to the dance.  A fun crowd, and we try to sprinkle in plenty of minor-keyed Scandinavian and Klezmer tunes to set a Halloween tone.

 Warming up with a soundcheck.
Tim on guitar, Jan, myself, Monica on piano


A walk-through with Pat teaching.


Some happy little tune

After the dance, back to Roberta & Tim's place (Tim of Moscow, not Middleton.  An abundance of Tims), where we unwind and get to bed too late.  Up in the morning for a fine home-cooked breakfast, this time of French toast, fruit, yogurt, and several cups of coffee.  The trip back home, where we lose the clock-time hour we gained yesterday, and off to bed so we can try to get some work done Monday morning.

It's fun and we plan to do it again.


Friday, October 26, 2018

Nuts!


I was right about something today: this took longer than I expected it to.


And I had the blank for the lower nut shaped and fit some time ago.  I cut the 5 understring grooves today, and glued it in place.  The upper nut is a re-used fiddle nut, the only decent piece of bone I had in the shop.  Need to order more stock.

In spite of it all, I actually rather enjoyed the challenge.  How are you going to cut that?  Which tools can I use to shape this?  A lunch break in the middle of it helped. 

I still don't know that the darn thing will work, but I'm that much closer to finding out.

Wednesday, October 24, 2018

Hardanger tailpiece, potentially viable


I've pushed onward with the making of the Hardanger tailpiece, not one to let ignorance stop me.  I'm still not sure it will work, but am basically now at the point I can try it, see what happens, and adjust.  I've already made one error, but probably not a fatal one.

I wanted a bone saddle in the tailpiece, and happened to have a saddle blank of micarta, artificial bone, of about the right size among my guitar-repair supplies.  I cut a groove in the tailpiece and then roughed out a similar corresponding angle on the micarta blank.


Some work with files and chisels on both maple and micarta, I managed to get it to settle in.


Then, got the top edge of the saddle down to near final, but still a little tall.  I want to glue it in before finishing this step, and have a few other things to do before that.


Notice in the template, cut out from a handy piece of junk-mail, that the string grooves leading out of the holes are at an angle away from the center.  I chose to ignore this, and that was an error.  I'll show you why a couple of paragraphs later.


I put a couple coats of stain on the maple, to make it prettier.


So the 4 upper strings are basically handled by this.  Now to make hooks under the tailpiece for the lower, or sympathetic, strings.  I went to the local feed & hardware store, but they didn't have anything thin enough and also strong enough.  One of these hooks will have three strings on it, and that can apply a lot of pressure to a small metal hook.

I was at a department store in town, however, and noticed these picture hangers.


Apparently the idea is that you pierce the wall with the straight end, feed it in until only the hook remains outside the wall, hang your picture there.  I have no idea if they work for that, but the specs said the metal could hold 50 pounds.  Kinda pricey, $7, but I was there and it was something to try.  Beats driving around to other stores, at least for now.

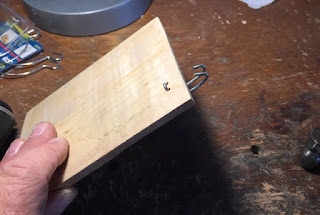
So, I ran a trial.  Cut off the hook end.  Bend the remaining piece into a U, ran it through a piece of scrap maple, bent the hooks underneath.  Not as tidy as I'd like, but seemed to work.  I could ask an experienced Hardanger maker what sort of metal they use, and may yet, but don't like to be a pest.  And, trying to figure something out often helps me understand when I later see a better solution.


So, with billowing sails, I did the same thing to the tailpiece.  A bit rustic, but it's in and something to proceed with.


The error with the string grooves -- too close to the holes for the wires.  I glued in some maple to fill the ends of those two middle string grooves (D & A in normal violin), and hope that keeps things from pulling through.  It's all an experiment right now.  Also have a couple coats of shellac on the maple and have glued in & finished the saddle.


Wednesday, October 17, 2018

Roughing out a Hardanger tailpiece


Since I'm really just trying to get the basic geometry down on my Hardanger fiddle build, I toyed with the idea of simply modifying a standard violin tailpiece.  That's ready to go for the top 4 strings, and then I can add some wire hooks for the 5 understrings.  But it just didn't seem right to me, especially in contrast with the traditional overlapping soundholes I had already made.

On the other hand, I didn't want to go with all the decoration on a traditional Hardanger.  That would be too much in contrast the other way with my rather plain build on the rest of the fiddle. A nicely figured piece of wood will have to be decorative enough for this one.

In Sverre Sandvik's book Vi byggjer Hardingfele -- English translation is (How) We Build the Hardanger Fiddle, translation by Eldon Ellingson -- are some details for the tailpiece.  It can't be too heavy.  It must not be too light.  Goldilocks.  But, one must start somewhere, so from the plans contained with the book, I traced the tailpiece outline with tracing paper, then onto a piece of cardstock (a bit of junk mail, actually).  Found a nice piece of cut-off maple from a previous violin top, traced it out there, using the cardstock template, and cut it out on the band saw.  Then, taking a block plane, start to clean up the top surface.


 Some more work with planes, knives, and rasps, it's starting to take shape.

 
Finer tools, and I got it to the point where I can call it roughed in.  I still need to drill the string holes, fit a saddle, and figure out how to put in the hooks for the 5 understrings, but I can think about that until tomorrow.


Of course, there is the underneath work, that the player seldom sees, but has the needed hollowed out places for the tailgut to fit, as well as thinning for the string holes.


Tuesday, October 9, 2018

Viola color varnish


The viola at the same stage as the Hardanger of yesterday. 


After these photos, I put a coat of clear varnish on each.  Guessing one more coat of clear in a couple days, then to let it harden a week or two, before polishing and fitting up.


And I really need to finish that sheetrock job one of these days.


Monday, October 8, 2018

Hardanger color varnish

A few snapshots.  I think the color is about where I want it.  Never quite happy with varnish, yet have learned that if I try too hard, it just gets worse.


Applied a coat of brown varnish yesterday. A coat of clear varnish tomorrow, perhaps, then another in a couple more days, and then to let it sit and harden a while before polishing.


My viola is at the same place in varnishing.  Will try to grab some snapshots of that tomorrow.


Friday, October 5, 2018

Cook a Pumpkin Dinner


Carving of a different sort today.  We learned this method from Tim Sommer of Purple Sage Farms in Middleton, Idaho.  He might have just made it up himself, but certainly folks do things like this elsewhere.  The method is an improvisation, and we do it somewhat different each time, depending on what we have on hand.  It's a great autumn & winter dinner.


Get a pumpkin.  Big is good.  This one is from the Peaceful Belly Farms stand at the Boise Farmers Market. 


In the glass bowl, I have chopped and skillet-fried sausage and vegetables.  Merguez lamb sausage from our friend Janie Burns of Meadowlark Farm here in Nampa.  Vegetables include garlic, onion, bell peppers, a jalapeno, mushrooms.  Some cilantro from Purple Sage.  Broccoli or something like that is a good addition, but we didn't have any.  It worked anyway.


Cut open the pumpkin as if making a jack-o-lantern and clean it out.  Don't cut eyes, nose or mouth!  You want the solid bowl structure.


Cut up a bunch of bread.  Stale is ok.  This is not stale, but is a mix of sourdough wheat and rye.  The bread will help soak up some of the water as the pumpkin cooks.  Grate some cheese.  Parmesan here.


 Oil the outside of the pumpkin to prevent it from drying out and scorching too much. Any cooking oil will work.


Start layering in the bread, vegetable & sausage, cheese.  Multiple layers is good.  I won't show them all here, but I think I had 3 layers of each, so 9 layers.  Maybe 10.  I didn't really keep track.  Fill it up.


Put the lid back on.  Remember to oil it, too.  I hit it with some spray cooking oil because by this time, my hands were a mess.


Into a pre-heated oven.  I set mine at 350 °F, but it runs a little low, which is good.  A lower temperature lets the flavors blend better.


Cook until done.  How do you know when it's done?  After an hour, check it by poking the pumpkin flesh with a knife.  If it's soft all the way through, it's probably done.  This pumpkin took about 2 hours to cook.  Will vary with size and content.


Take the top off, and scrape the meat from the pumpkin, mixing it in with all the stuffing inside.


Scoop out what you want and eat it.  Go back for seconds.  Good stuff.


Obligatory fiddle post -- Hardanger and viola in the varnish drying closet.


Wednesday, October 3, 2018

Some varnish work


Varnishing a fiddle can be frustrating.  It's tempting to put on thick layers to be done with it.  If I could do that, I would.  But I've found I do best with several thin layers, built up slowly.  Even that is not fool-proof.  This fool knows from experience.

Anyway, the Hardanger is the smaller one on the left, and the viola is the bigger one on the right.  Getting there.  Be making music with them soon.