Showing posts with label medieval fiddle. Show all posts
Showing posts with label medieval fiddle. Show all posts
Thursday, June 3, 2010
Neck on the Medieval Fiddle
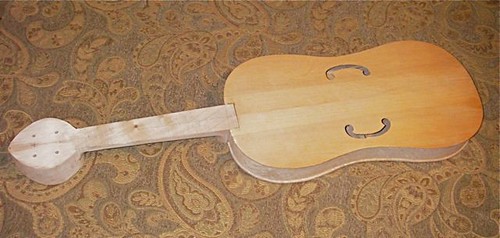
I got the neck set last week, and had hoped to use an old cello fingerboard -- but it didn't have thick enough wood to do what I wanted. Also, I'm leaving for the violinmaker's workshop on Sunday, and so this will have to be it for the Medieval fiddle until after the Weiser fiddle contest. I had hoped to be able to mess about with it there. Oh well.


Tuesday, May 11, 2010
Medieval fiddle, making the neck & pegbox.
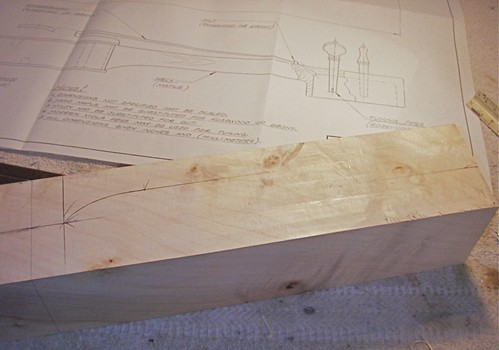
Laying out the lines for the neck on this chunk of local maple. It's about 3-1/2 inches square in the cross-section, a little narrower than the plans call for. It's all approximate!
I cut the neck to rough shape on the table saw and my small, bench-top bandsaw (for the curvy parts!).
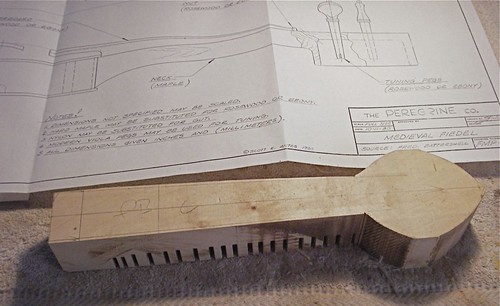
After a fair amount of gouge and rasp work, the basic shape of the neck is starting to show.
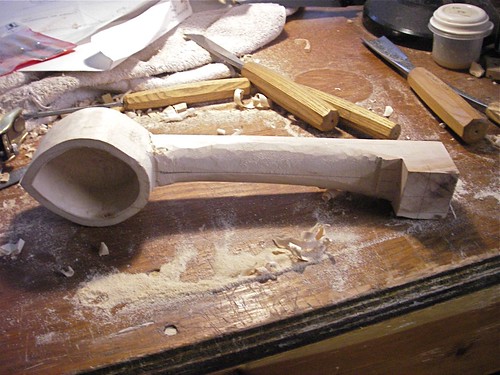

I cut the neck to rough shape on the table saw and my small, bench-top bandsaw (for the curvy parts!).

After a fair amount of gouge and rasp work, the basic shape of the neck is starting to show.

Wednesday, February 3, 2010
Medieval fiddle and old antiquing
Below shows the back cut out, ready to be glued to the ribs. I left the two bar-code stickers (Zebras) in place, so that future generations may know that this wood came from the shelves at Woodcraft! :-)

I removed the rib garland from the mould, harder than it should have been. Next time, if I use this mould again, I need to allow more room on the sides of the blocks to wiggle the mould out. I had assumed that it would be fairly straight-forward with those big floppy sides, but it wasn't. After I got the mould out, I cleaned up and shaped the blocks, neck and end, and glued the ribs to the back. Quite the assortment of motley clamps here.

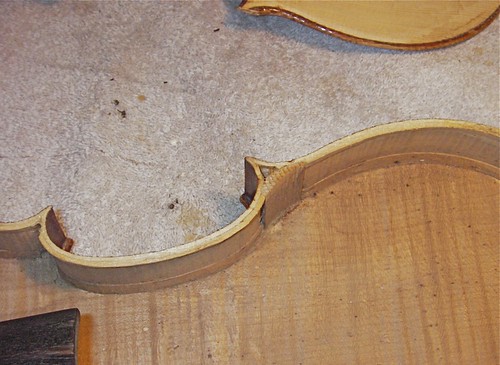
Below is an inexpensive early 20th century violin, in for repair. A family instrument with significant sentimental value, it is roughly carved, integral bass bar, fake lower blocks, no upper blocks. And yet, at the factory they stained the inside during construction to make it appear older through the f-holes of the finished instrument. The light areas on either side of the end-block are where the stain is lacking (also along the upper treble lining), while the stain shows on the end-block's lower end.
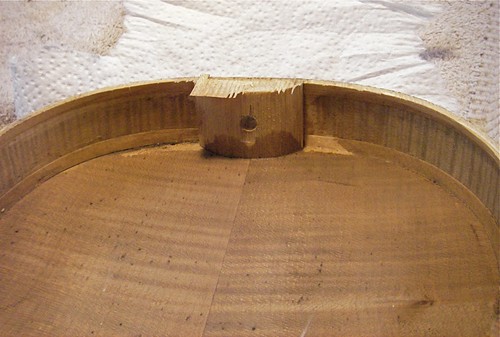
The photos below show the fake lower blocks, which look real when seen through the f-holes, and the absence of even a fake blocks on the upper corner, which is harder to see through the f-hole when assembled. This one does have linings top and bottom all the way around. Note also the Stradiuarius label.

I applied the first coat of colored varnish on my conventional violin today, but it looked too pink and spotchy. Was supposed to be a red-brown. I wiped it off in disgust, and will try a brown coat tomorrow.

I removed the rib garland from the mould, harder than it should have been. Next time, if I use this mould again, I need to allow more room on the sides of the blocks to wiggle the mould out. I had assumed that it would be fairly straight-forward with those big floppy sides, but it wasn't. After I got the mould out, I cleaned up and shaped the blocks, neck and end, and glued the ribs to the back. Quite the assortment of motley clamps here.

Below is an inexpensive early 20th century violin, in for repair. A family instrument with significant sentimental value, it is roughly carved, integral bass bar, fake lower blocks, no upper blocks. And yet, at the factory they stained the inside during construction to make it appear older through the f-holes of the finished instrument. The light areas on either side of the end-block are where the stain is lacking (also along the upper treble lining), while the stain shows on the end-block's lower end.

The photos below show the fake lower blocks, which look real when seen through the f-holes, and the absence of even a fake blocks on the upper corner, which is harder to see through the f-hole when assembled. This one does have linings top and bottom all the way around. Note also the Stradiuarius label.


I applied the first coat of colored varnish on my conventional violin today, but it looked too pink and spotchy. Was supposed to be a red-brown. I wiped it off in disgust, and will try a brown coat tomorrow.
Friday, January 22, 2010
Fitting linings.
Spent a little time this afternoon cutting lining stock out of a thin willow board, then here thinning it down with a plane to a bendable thickness, about 2 mm.
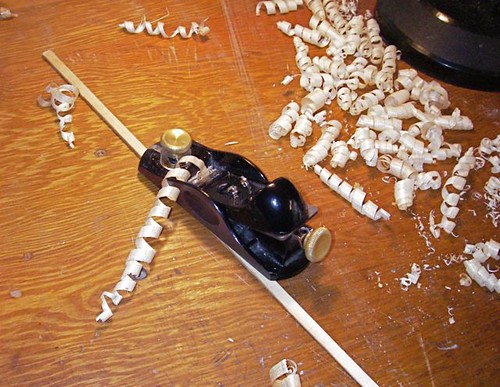
It's fun to see the curls coming out of the plane. I guess you could use them for a little doll's hair.
Below is one side of lining is glued into place, the other waiting for gluing. Clothespins reinforced with rubber bands make great lining clamps.
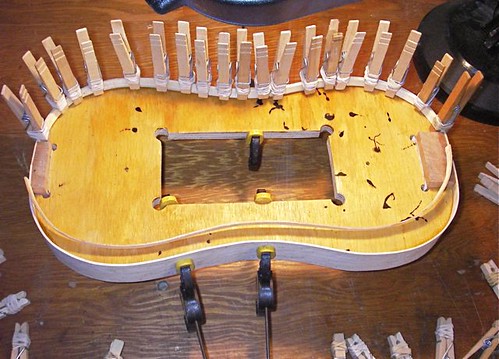
The linings do a couple of things. They help make the ribs a bit stiffer, with out filling the whole width. They also create a wider edge than just the rib itself, giving a better gluing platform for the back, in this case, or the top, on the other side.

It's fun to see the curls coming out of the plane. I guess you could use them for a little doll's hair.
Below is one side of lining is glued into place, the other waiting for gluing. Clothespins reinforced with rubber bands make great lining clamps.

The linings do a couple of things. They help make the ribs a bit stiffer, with out filling the whole width. They also create a wider edge than just the rib itself, giving a better gluing platform for the back, in this case, or the top, on the other side.
Wednesday, January 13, 2010
Joining the back, bending the ribs.
Today I planed the center seam for the back for the Medieval fiddle. This is thin stock, birds-eye maple, straight off the shelf at the local Woodcraft store. I had visions of this being easier to join and the planing went well, but gluing was a bit tricker.

You can see the two pieces intended for the back, on top of a piece of birch plywood. This is just to give a little height to the back-stock, and I run the jointer plane along the bench on its side. As I got the edges near square, I really had to back off the plane. Those little birds-eyes just love to tear out.
Below is a pile of glued and clamped parts -- not the recommended way to store things, but space was at a premium today. Bent one side, cut it to length, and glued it in place today. Did a preliminary bend on the other side. This mould is too thin for these tall ribs, and may need some modification, such as adding several blocks around the perimeter. That or cut another out of thicker stuff.
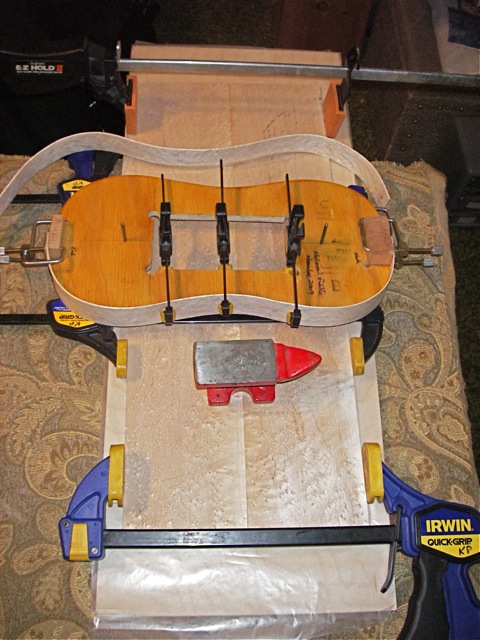
Underneath is the joined back, held together by the horizontal clamps. The little anvil is a weight to help hold the two joined pieces flat. It was actually a little tricky gluing this thinner stock together, as opposed to the typical wedges in violin making; it wanted to buckle with the clamps, but didn't seem to have enough 'meat' for an unclamped rub-joint.

You can see the two pieces intended for the back, on top of a piece of birch plywood. This is just to give a little height to the back-stock, and I run the jointer plane along the bench on its side. As I got the edges near square, I really had to back off the plane. Those little birds-eyes just love to tear out.
Below is a pile of glued and clamped parts -- not the recommended way to store things, but space was at a premium today. Bent one side, cut it to length, and glued it in place today. Did a preliminary bend on the other side. This mould is too thin for these tall ribs, and may need some modification, such as adding several blocks around the perimeter. That or cut another out of thicker stuff.

Underneath is the joined back, held together by the horizontal clamps. The little anvil is a weight to help hold the two joined pieces flat. It was actually a little tricky gluing this thinner stock together, as opposed to the typical wedges in violin making; it wanted to buckle with the clamps, but didn't seem to have enough 'meat' for an unclamped rub-joint.
Tuesday, January 12, 2010
Thinning ribs
Finally back to a little building work today, on the Medieval Fiddle. I cut the rib stock to near width, then planed it down to a bendable thickness with a toothed plane to avoid tear-out in the birds-eye maple.
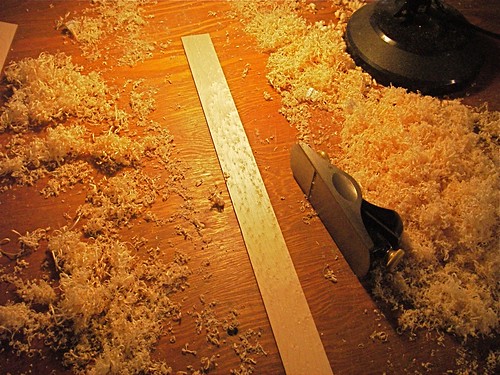
Below is a close up of the tool-marks left by the toothed-plane blade. Often this is scraped down to a smooth surface in a violin, but I am going to leave these -- they'll be on the inside of the fiddle and virtually invisible -- but I'll know they're there, and smile. It seems very organic, primitive, real.
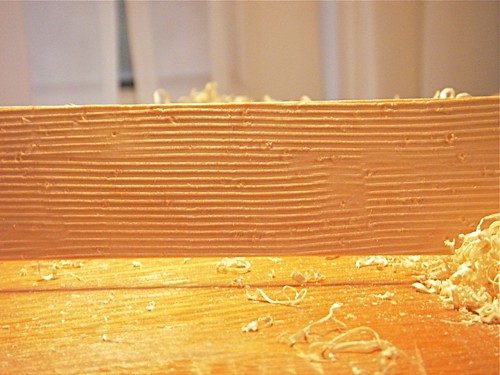
The 'birds-eye' figure shows up as little dots here -- birds' eyes! A highly non-uniform grain.

Below is a close up of the tool-marks left by the toothed-plane blade. Often this is scraped down to a smooth surface in a violin, but I am going to leave these -- they'll be on the inside of the fiddle and virtually invisible -- but I'll know they're there, and smile. It seems very organic, primitive, real.

The 'birds-eye' figure shows up as little dots here -- birds' eyes! A highly non-uniform grain.
Tuesday, December 22, 2009
A little Yule-time building.
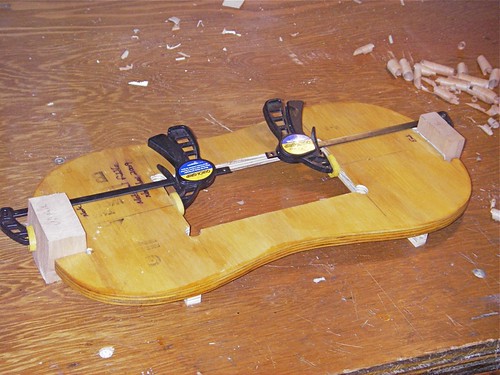
After a couple weeks of much cello repair, I decided to take some time to push my own instruments along. Here I have squared up the neck and end blocks for the Medieval fiddle. I have spacers under the form to lift it to approximately the middle of the 40 mm ribs, which will be bent and added after the blocks are shaped. The blocks are lightly glued to the form, and in clamps here.
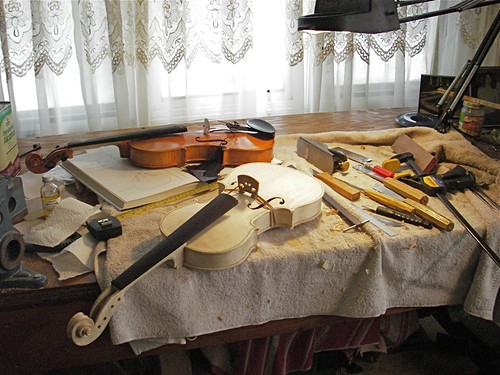
I spent the morning fitting the neck to the body of my current violin. Once I got it to the 'good enough' point, I decided to take lunch, then look at it again afterwards with fresher eyes. As I left, I turned back to the bench, saw the mess in the midst of the process, and thought it might be an interesting photo. On the white instrument, the neck is not glued in yet, but sitting in place, held by friction.
This afternoon, with the neck fit ok, I glued it in place. The heel of the neck is still square; that will be rounded and the neck finished after the glue has set -- perhaps tomorrow.


I spent the morning fitting the neck to the body of my current violin. Once I got it to the 'good enough' point, I decided to take lunch, then look at it again afterwards with fresher eyes. As I left, I turned back to the bench, saw the mess in the midst of the process, and thought it might be an interesting photo. On the white instrument, the neck is not glued in yet, but sitting in place, held by friction.

This afternoon, with the neck fit ok, I glued it in place. The heel of the neck is still square; that will be rounded and the neck finished after the glue has set -- perhaps tomorrow.

Sunday, November 15, 2009
Medieval Fiddle, part 1
It's something I've wanted to build for some time, but haven't yet. We now have a group of Renaissance enthusiasts who are putting together a Ren Faire next year. They contacted me looking for musicians, dancers, etc., so I thought this would be a good excuse to actually get to work on one.
Here's a Medieval fiddle in action.
I had a plan for one, so got it out, laid over some tracing paper, and marked it out with pencil.

There are bound to be other, better ways to do this, but this is how I approach making a violin mould, and it's what I know. Once the tracing is adequate, I need to make a stiff template in that shape. In the past, I have used thin metal, because it's durable, but for this one I'm going to try something easier to cut, and use what's on hand. I had pickguard material, such as used on guitars, lying about, so glued the tracing onto it.

With a knife and file, I cut it out, and smoothed it up. I have left a tab to the far side, with a couple holes along the center line. These are used to put the template down in the same place -- a registration device.
Again staying with the simple approach, I found a piece of construction grade plywood in the shop, left-over from a bit of roof replacement we did a couple years ago. I lay-out a centerline, then drill a couple holes corresponding to the holes in the template, and drive a modified 16d nail into each hole. The modification is that I cut off the heads and rounded the shafts. I use a small machinist square to make the nails square to the plywood.

Next, lay the template on the nails, trace out one half, pull the template up, flip it over, trace the other half. Remove the template and cut it out. Actually, I cut close to the line, then finish up with files, knives, planes -- whatever works for any particular part. One problem with construction grade plywood is that it's a bit coarse in plys, so is easy to tear. On my violin moulds, I use a higher grade birch plywood with more, and thinner, plys.

At the inside corner of each block I drill a hole to allow for glue squeeze-out. The big cut-out in the center is simply for clamping. I use modern clamps to hold the blocks and ribs in place while gluing. A traditional method, at least for violins, would use round holes for dowels. String is then used to hold the ribs or blocks in place while gluing.
Here's a Medieval fiddle in action.
I had a plan for one, so got it out, laid over some tracing paper, and marked it out with pencil.

There are bound to be other, better ways to do this, but this is how I approach making a violin mould, and it's what I know. Once the tracing is adequate, I need to make a stiff template in that shape. In the past, I have used thin metal, because it's durable, but for this one I'm going to try something easier to cut, and use what's on hand. I had pickguard material, such as used on guitars, lying about, so glued the tracing onto it.

With a knife and file, I cut it out, and smoothed it up. I have left a tab to the far side, with a couple holes along the center line. These are used to put the template down in the same place -- a registration device.
Again staying with the simple approach, I found a piece of construction grade plywood in the shop, left-over from a bit of roof replacement we did a couple years ago. I lay-out a centerline, then drill a couple holes corresponding to the holes in the template, and drive a modified 16d nail into each hole. The modification is that I cut off the heads and rounded the shafts. I use a small machinist square to make the nails square to the plywood.

Next, lay the template on the nails, trace out one half, pull the template up, flip it over, trace the other half. Remove the template and cut it out. Actually, I cut close to the line, then finish up with files, knives, planes -- whatever works for any particular part. One problem with construction grade plywood is that it's a bit coarse in plys, so is easy to tear. On my violin moulds, I use a higher grade birch plywood with more, and thinner, plys.

At the inside corner of each block I drill a hole to allow for glue squeeze-out. The big cut-out in the center is simply for clamping. I use modern clamps to hold the blocks and ribs in place while gluing. A traditional method, at least for violins, would use round holes for dowels. String is then used to hold the ribs or blocks in place while gluing.
Subscribe to:
Posts (Atom)
